
Your website chat.
Make the chat look like your brand, choose how visitors get help, and decide where it shows. Changes reach your website when you click Save changes.
Make it look like your brand.
Watch the preview as you go. Your website changes only when you save.
Open Web Chat
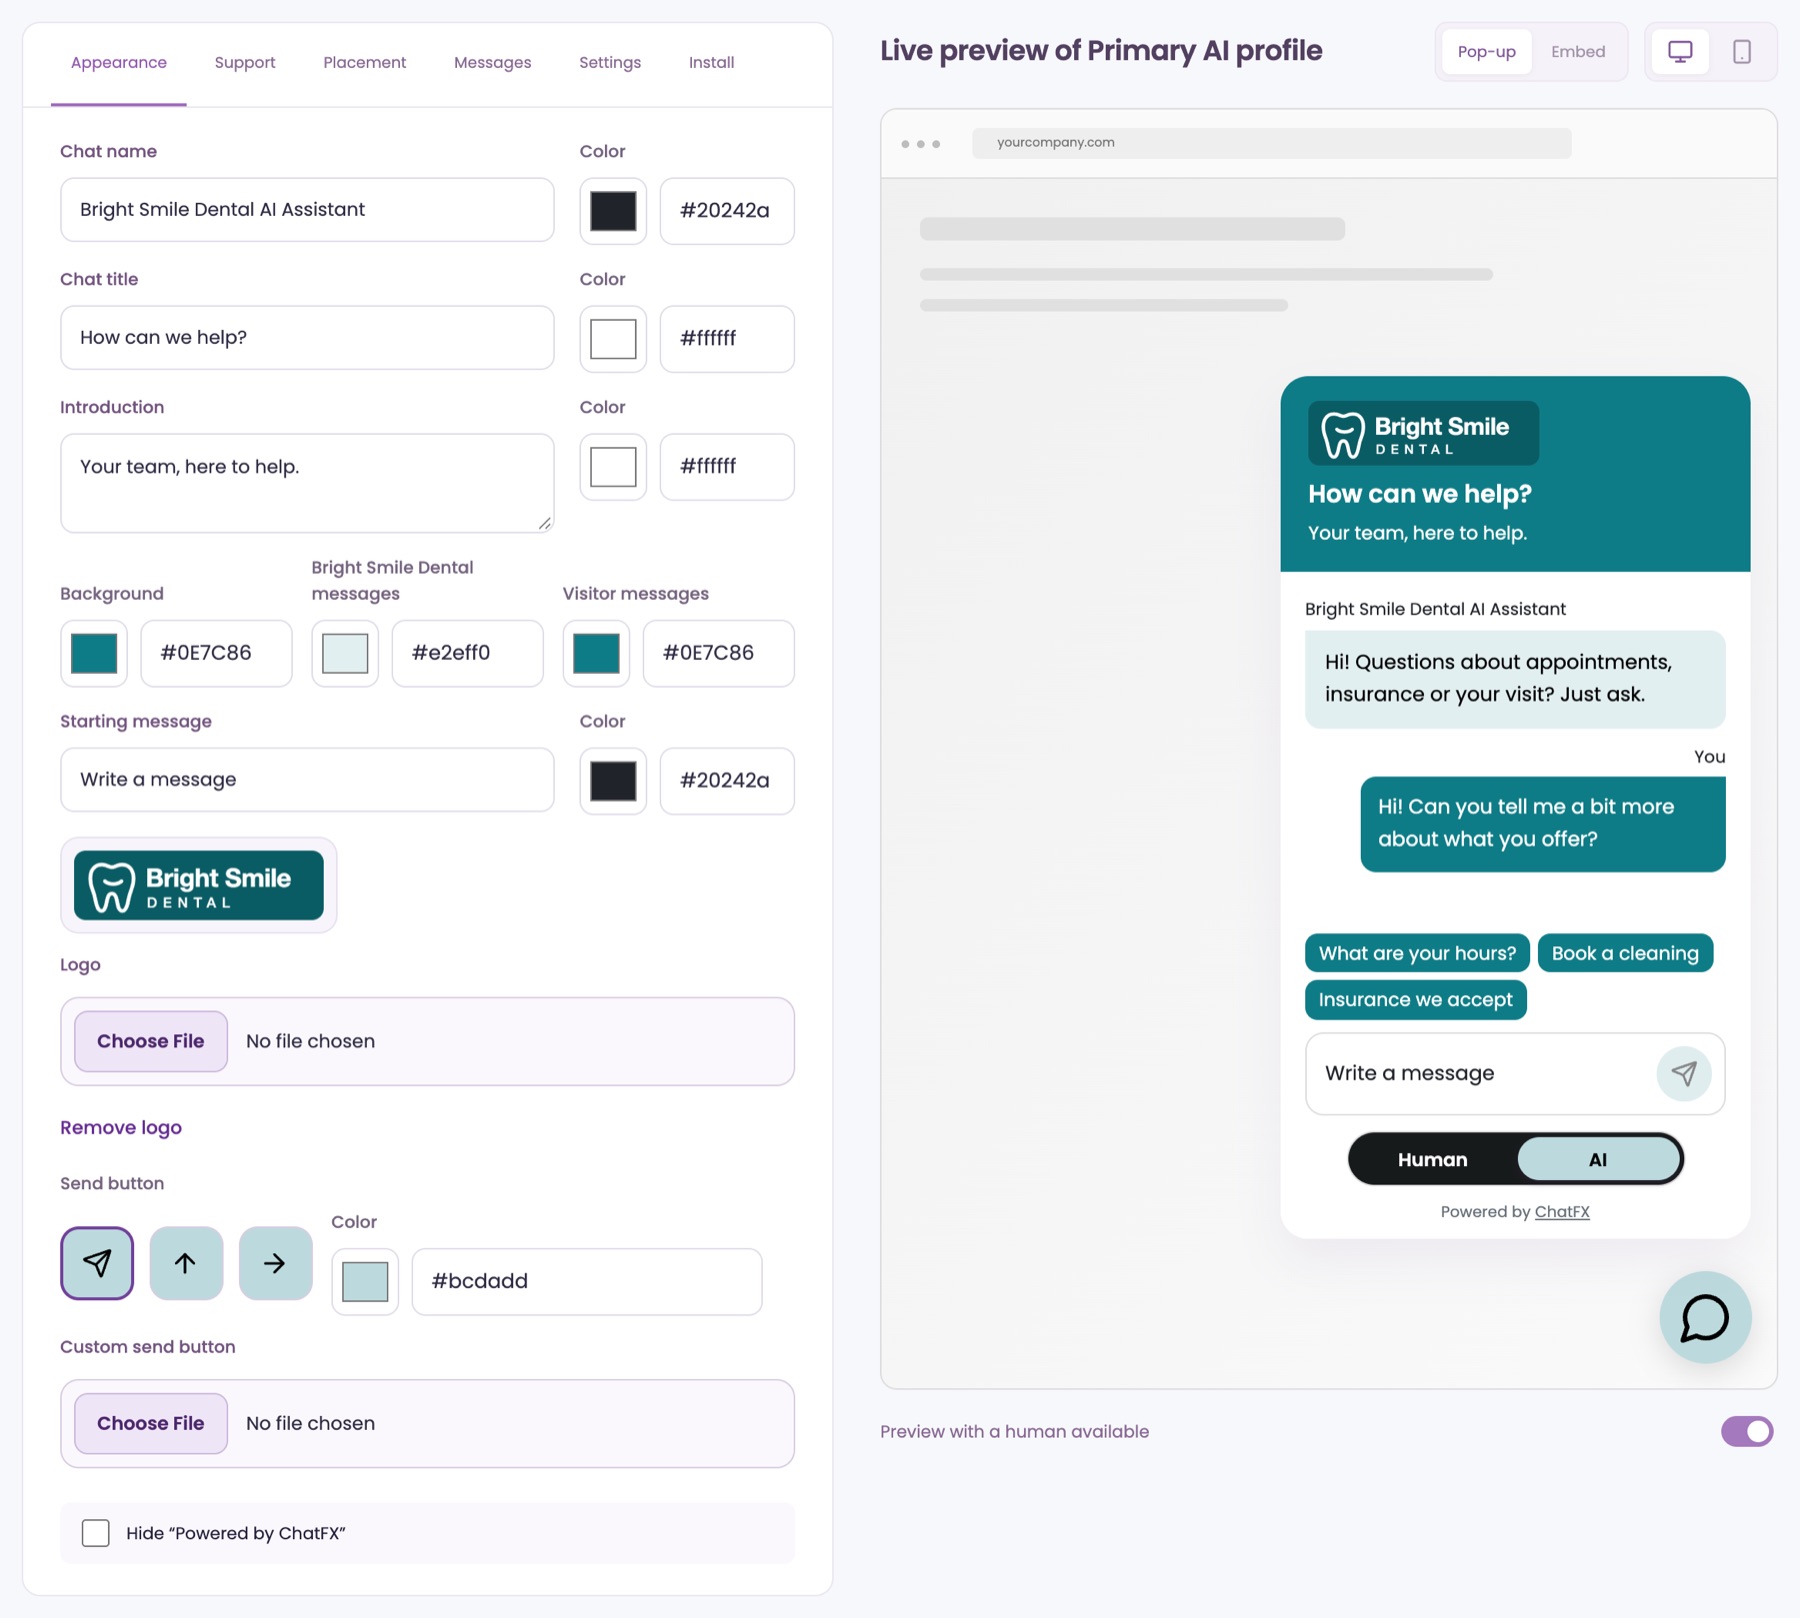
In the menu, open Web Chat. The tabs are on the left and the live preview is on the right. Switch the preview between Pop-up and Embed, or computer and phone. Preview with a human available shows the chat when someone on your team can join.
Set the name, title and colors
On the Appearance tab, set the Chat name, Chat title and Introduction, each with its own Color. The Background, Visitor messages and your business's message color set the rest.
Pick a color, or type a six-digit code such as #662D91.
Add your logo and send button
Upload your Logo as a PNG, JPEG or WebP, up to 5 MB. Under Send button, pick Paper plane, Up arrow or Right arrow and its Color, or upload a Custom send button.
Style the chat button
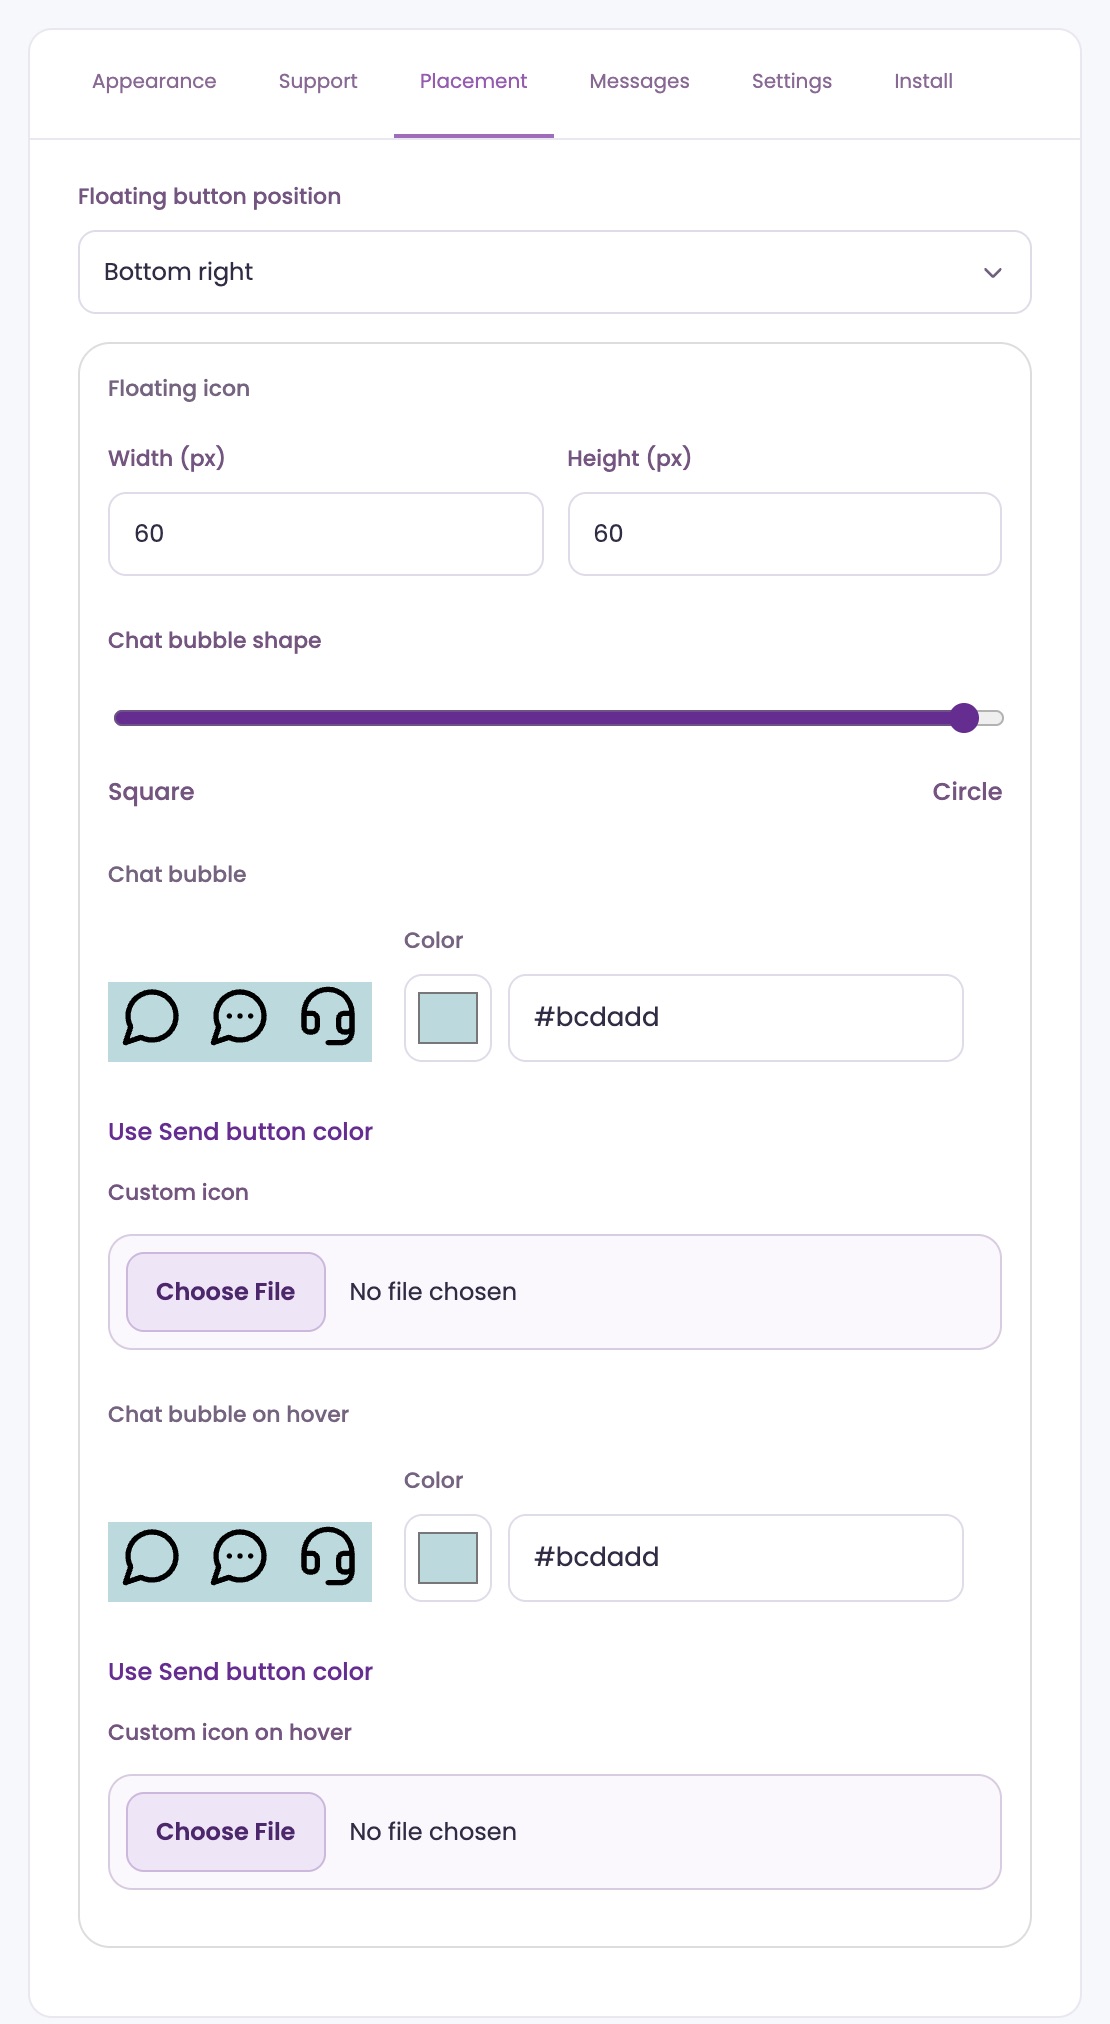
On the Placement tab, choose the Floating button position, its Width (px) and Height (px), and a Chat bubble shape from Square to Circle.
Under Chat bubble and Chat bubble on hover, pick an icon and color, or upload a Custom icon. Use Send button color matches the send button.
Hide “Powered by ChatFX”Pro
On Pro, check Hide “Powered by ChatFX” on the Appearance tab. On Starter it always shows. Change plans in Billing.
Say hello your way.
What visitors read first, and the questions they can tap.
Write the welcome
On the Messages tab, Welcome message is the first message visitors see. It starts as "Hi there. How can we help?"
Set the away message
When the team is away shows on the email form when no one can join the chat.
Add suggested questions
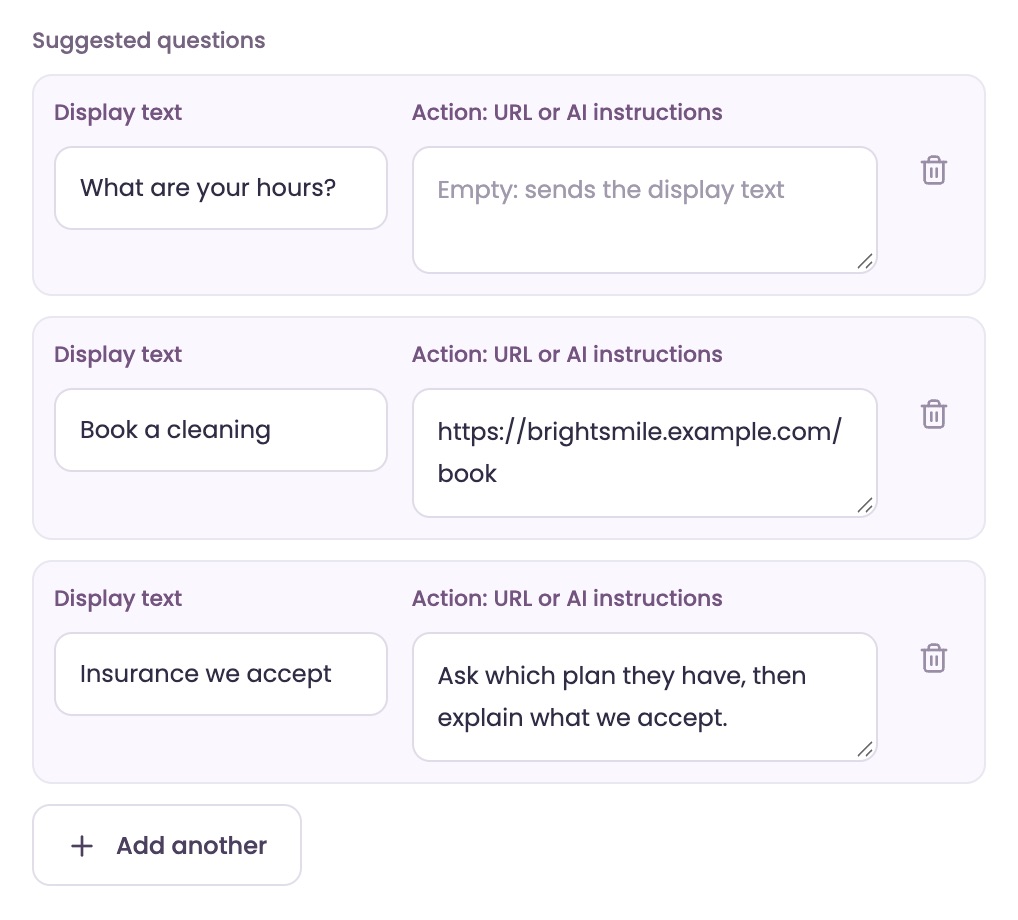
Click Add another and type the Display text visitors tap. In Action: URL or AI instructions, leave it empty to send the question, enter a web address to open that page, or write directions for the AI. You can add up to 20.
They show above the message box until the visitor sends a first message.
Show sources
On the Settings tab, Show sources in AI answers adds reference numbers and the pages an answer came from. It's off to start.
Other languages
Wording you leave as it came shows in the visitor's language. Wording you write shows exactly as you wrote it. The AI replies in the language the visitor writes in.
How visitors get help.
Choose who can answer, and where messages go when no one can.
Choose who can answer
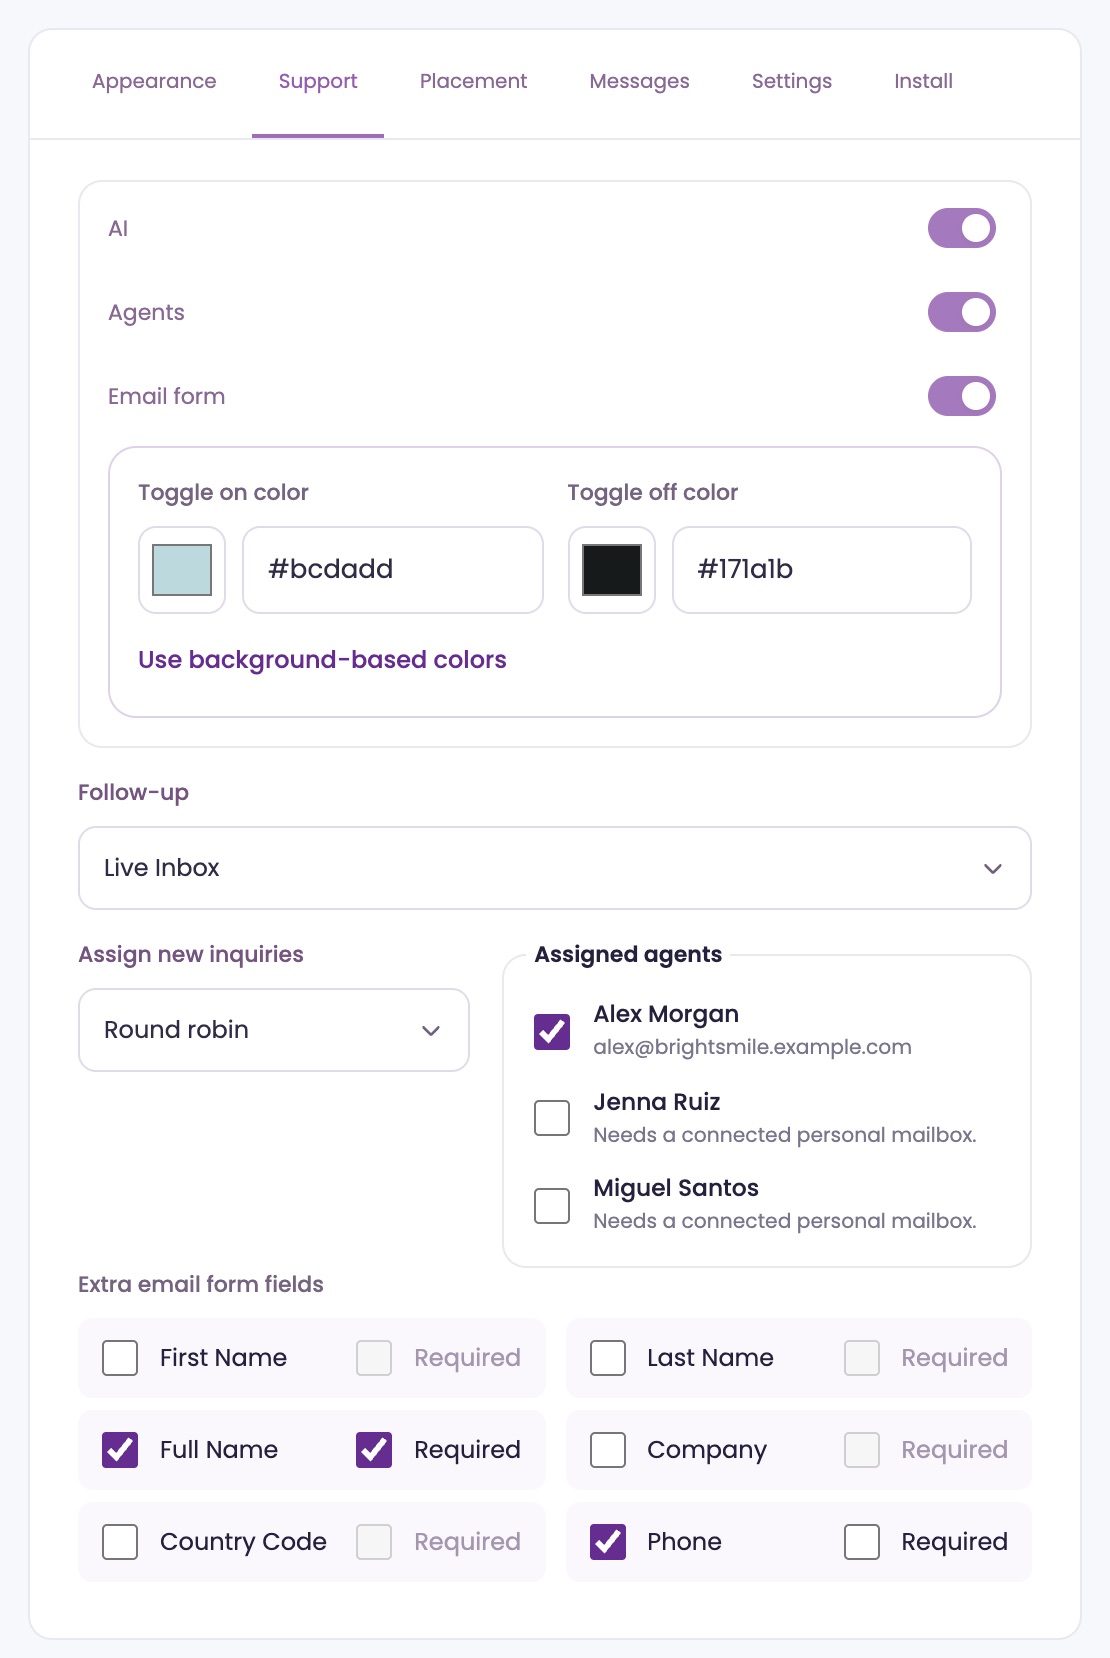
On the Support tab, turn AI, Agents (your team) and Email form on or off. Keep at least one on.
With AI on, the AI answers first. Visitors can switch to a person when someone on your team is Available, or use the email form when no one is. With only Agents on, the chat hides when no one is Available.
Color the switch
With two or more on, visitors see a switch at the bottom of the chat. Set its Toggle on color and Toggle off color, or click Use background-based colors.
Choose where messages go
Set Follow-up to Live Inbox or Email only. A new account starts on Email only, sent to the email you signed up with.
For Live Inbox, choose Round robin or Fewest open conversations and check the Assigned agents. Each message goes to one of them. For Email only, type the Email destination.
Choose the email form's fields
Under Extra email form fields, check the fields you want and Required for any that must be filled in. Email and message are always on the form. Use Full Name or First Name and Last Name, not both.
Choose who gets a live chat
On the Settings tab, Chat routing is Anyone (first to accept) to start. Round robin takes turns, and Fewest open chats picks whoever is least busy. Calls that ask for a person follow the same rule.
Where and when it shows.
The chat shows only on websites you list, and you can hide it wherever you like.
List your website
On the Install tab, Websites allowed to show this chat already has the website you signed up with. Your main address and its www version work together. Add other subdomains, like https://shop.yourbusiness.com, on their own line.
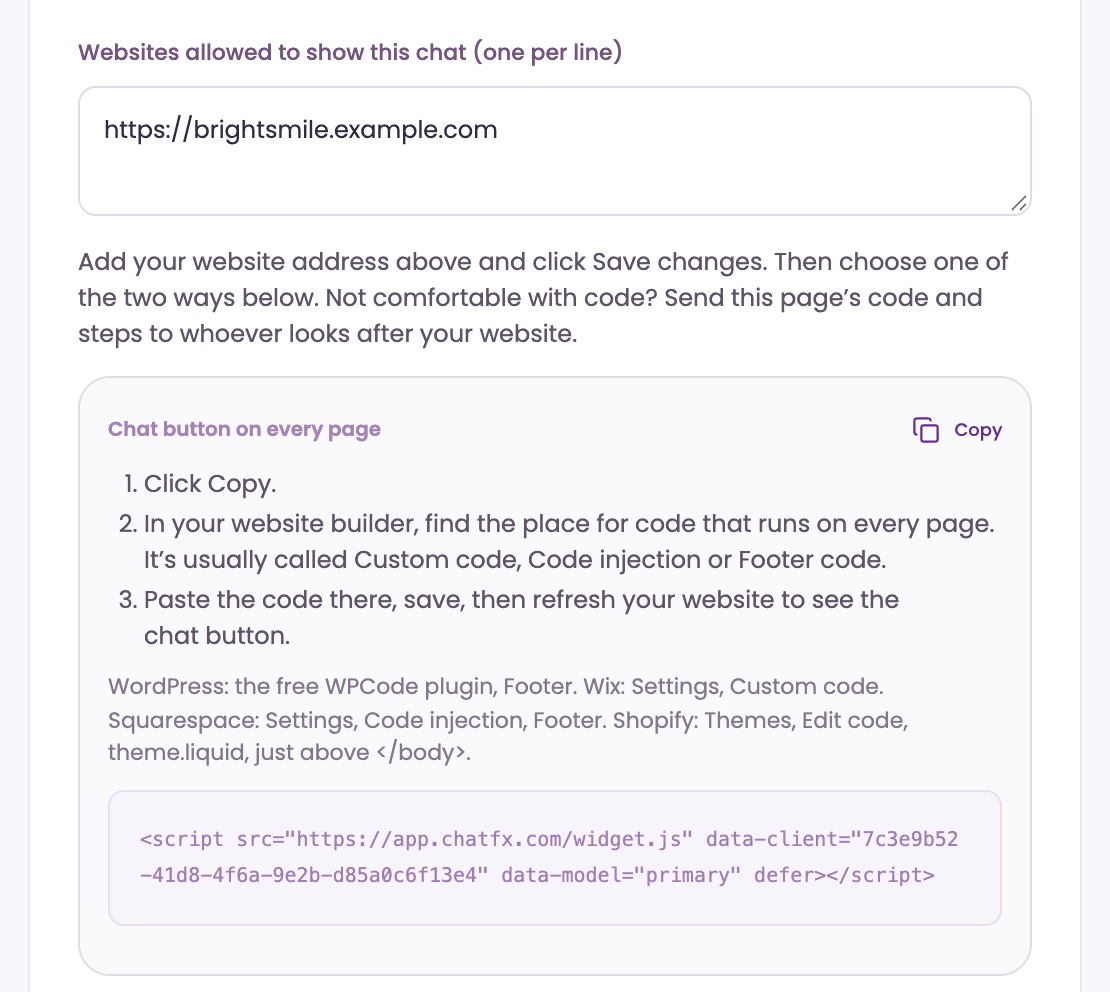
Add the code to your site
Copy Chat button on every page or Chat inside one page and paste it into your website. The install guide has the steps for each website builder.
Turn it on or off
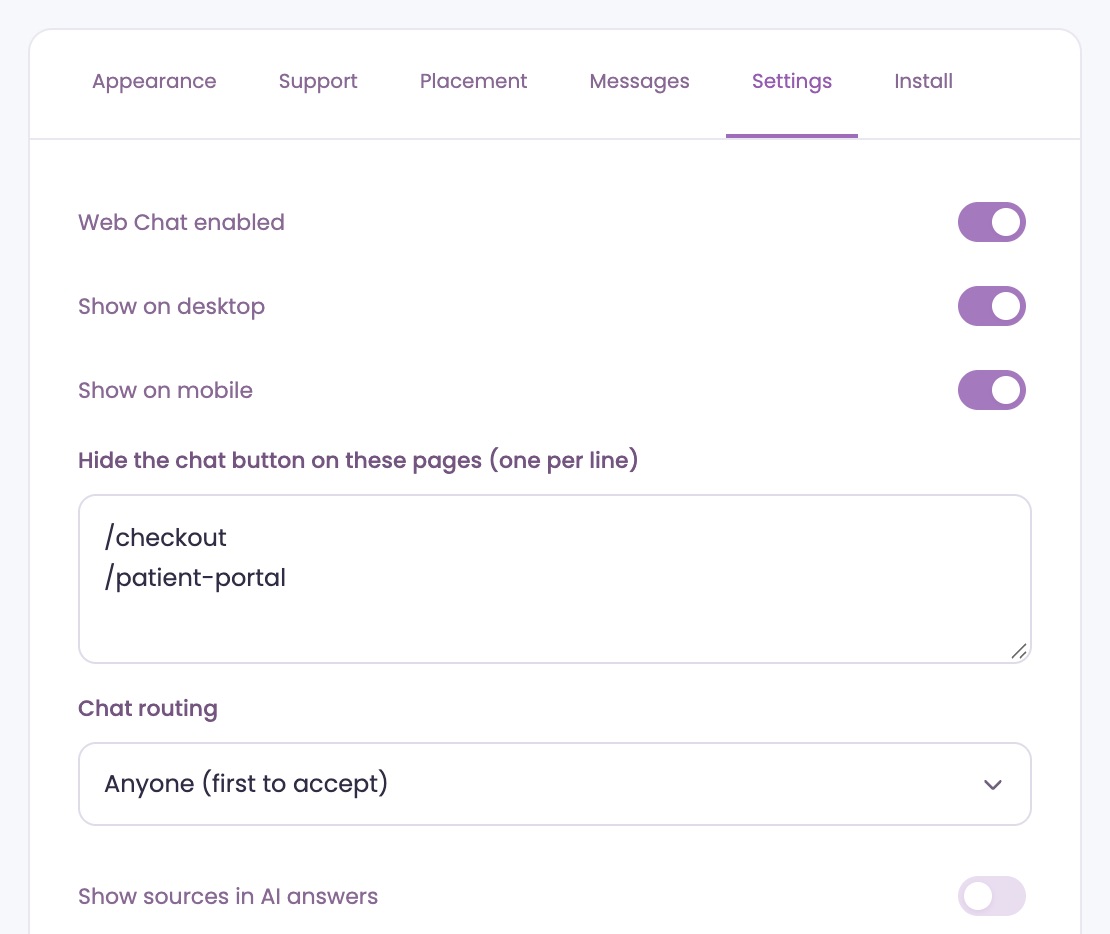
On the Settings tab, Web Chat enabled turns the chat off everywhere. Show on desktop and Show on mobile control each kind of screen. Screens up to 640 pixels wide count as mobile.
Hide it on some pages
Add pages to Hide the chat button on these pages, one per line. A path like /checkout hides that page and every page under it. A single / hides only your home page, and a full address hides only that page.
A chat placed inside a page always shows.
Choose when it opens and closes
Open by itself after (seconds, desktop) is 5 to start, up to 300. On phones the chat opens only when tapped, and once a visitor closes it, it won't open by itself again on your site for 24 hours.
Close when idle ends a quiet chat after that many minutes: 5 to start, from 3 up to 1,440.
Add a privacy notice.
Show a short notice with links, and ask for consent if you need it. There's no code to write.
Turn it on
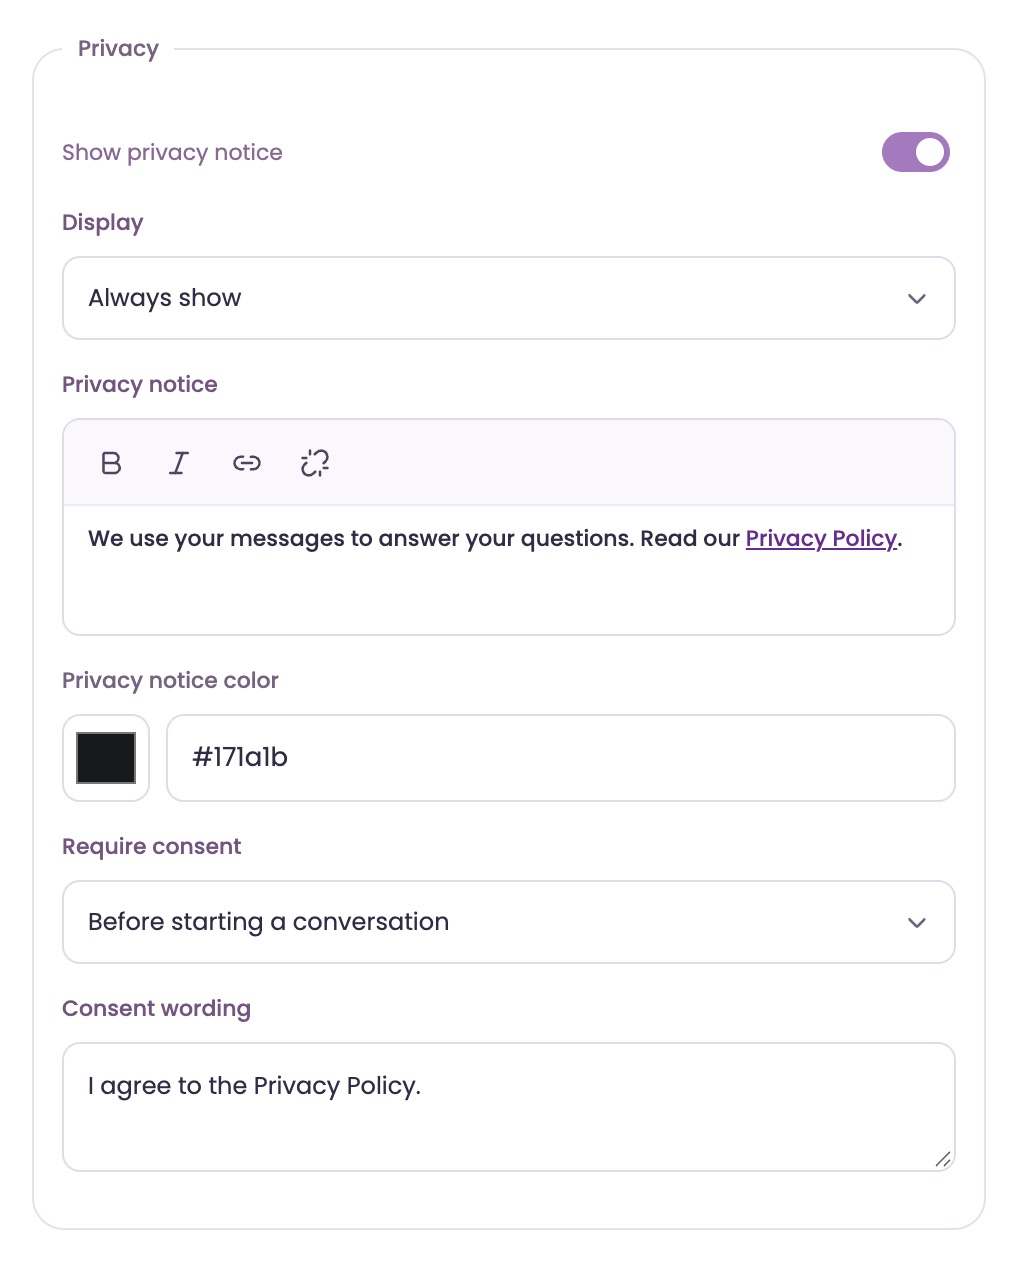
On the Settings tab, under Privacy, turn on Show privacy notice. In Display, choose Always show or With form fields only, where visitors are asked for contact details.
Write the notice
Type it in Privacy notice. Select words and click Bold or Italic. For a link, select the words, click Add a link, type the address and click Add link. Remove link takes it off.
Privacy notice color is optional, and Use Toggle Off color puts it back.
Ask for consent
In Require consent, choose No consent checkbox, Before starting a conversation or When submitting a contact form. Then write the Consent wording visitors check. If you change the notice or the wording later, visitors are asked again.
Ask our assistant or a person.
Our assistant answers questions about ChatFX right away. For anything else, email service@chatfx.com and a real person will reply.
Frequently asked questions
How do I add ChatFX chat to my website?
Add your website address to the allowed list on the Install tab, then copy and paste the chat code into your site. You can choose a floating chat button or a chat embedded inside a page. The install guide has steps for popular website builders.
Can visitors talk to a person instead of the AI?
Yes. When AI and Agents are enabled, the AI answers first and visitors can switch to a person when a team member is Available. If no one is available, visitors can use the email form if you have enabled it.
Why isn't the ChatFX button showing on my website?
Check that Web Chat is enabled, your website is on the allowed list, and the chat code is installed. Also check the desktop and mobile display settings and any hidden-page rules. If only Agents are enabled, the chat hides when no one on your team is Available.
Can ChatFX answer website visitors in other languages?
Yes. The AI replies in the language the visitor writes in. Default wording you leave unchanged appears in the visitor's language, but wording you write yourself appears exactly as you entered it. That applies to custom text such as your welcome message.
How much does it cost to remove “Powered by ChatFX” from the chat?
You can hide “Powered by ChatFX” on the Pro plan, which costs $200 per month and includes 500 credits per month. On Starter, the branding always shows. To hide it on Pro, check the option on the Appearance tab.
Can customers book a meeting through the ChatFX chat?
Yes. With meeting booking on the Pro plan, the AI can offer open times in the chat. Connect your calendar and choose who holds meetings to set it up. The meeting booking guide covers calendars, hosts and available times.